Angular NgRx Example Sharing Data Between two different components using NgRx (Learn it in 27 Steps)

Hi Everyone !!!
Am Srikanth Y,
Software Engineer | Front End Developer |Story Teller | Problem solver, Having Realtime experience in Angular, JavaScript, and Java.
Git Hub: github.com/mryenagandula. StackBlitz : stackblitz.com/@mryenagandula Medium: mryenagandula.medium.com
Please support Srikanth Y (buymeacoffee.com/mryenagandula)
Note To Audience : There is a problem in some Articles due to the conversion of the medium articles. Am working on modifying them. Sorry For the inconvenience.
Thanks
Thanks for visiting my medium, This article gives you information about how to share data between two different components using the Ngrx concept. Please find the below steps to implement the above criteria.
Step 1. Create an angular project with the below command.
ng new angular-ngrx-sharing-data-between-two-components
Step 2. After successful creation of the angular app, change the file directory to project-name. “cd angular-ngrx-sharing-data-between-two-components”
Open project in vs code using “code .” in terminal or open within “vs code”. Then run the project using “ng serve” in the terminal (To avoid errors always do “npm install” before “ng serve”). Open the project in chrome using localhost:4200
Step 3. Open “app.component.html” in vs code and remove the content which is created by “Angular CLI” while creating the app.
Step 4. For adding “NgRx library” by using the command and install all libraries along with “@ngrx/Store” like “@ngrx/effects”, “@ngrx/store-devtools” “@ngrx/schematics”, Please find the command below.
/** Install all in one**/

npm install @ngrx/store @ngrx/effects @ngrx/store-devtools @ngrx/schematics --save

/**(OR)**/

/** Install one after another**/

npm install @ngrx/store
npm install @ngrx/effects
npm install @ngrx/store-devtools
npm install @ngrx/schematics
Step 5. Change default “Angular CLI” to “NgRx CLI” to install actions, reducers, and effects. Don’t worry it won’t affect any angular-related commands.
ng config cli.defaultCollection @ngrx/schematics
Step 6. To generate store, state, and reducers setup please run the below command and give the root module to “app.module.ts”.
ng generate store UserState — root — module app.module.ts**
Step 7. After executing the above command the reducers folder will be created and the “index.js” file will be there.

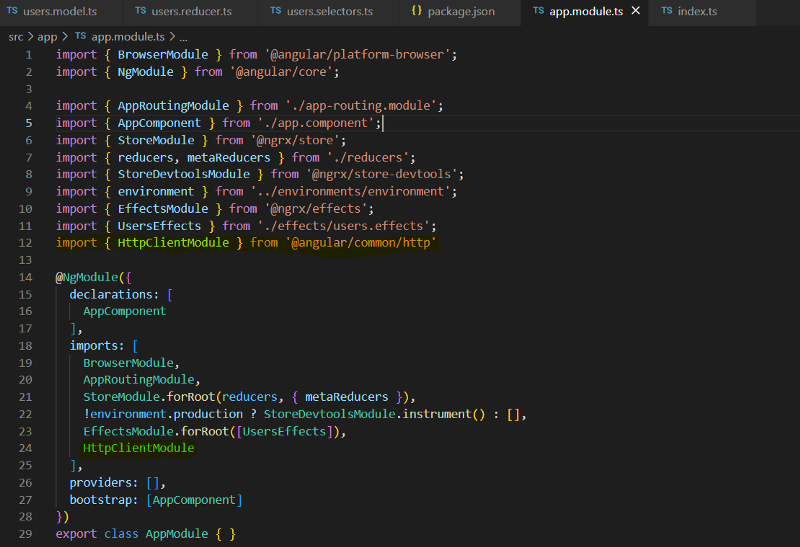
And Also Inside the “app.module.ts” file import array is updated with new lines of code as I mentioned in the yellow-colored text below the image.

The auto-generated “index.js” file will be like the one below. In this “index.js” the state and reducer will be added by default after performing the above command.
Step 8. Please run the below commands to generate actions, effects, selectors, and reducers.
ng generate action actions/users
ng generate reducer reducers/users
ng generate effect effects/users
ng generate selector selectors/users
Attached screenshot of the terminal window in which I ran the commands to generate action, effects, selectors, and reducers

Step 9. So the NgRx schematics are generated automatically with a few files contains with sample data, Please find below the files.
- Actions are in the sense of calling the actions like run, catch, and drop.
- We need users’ data so I created the load Users action to get the user’s info and loadUsersSuccess for storing data after receiving data from API, and loadUsersFailure action to store the error which is thrown by the API.
Note: Terminal generates only 3 actions by default, if you want to add more, You only manually need to add those actions.
- In the same way, We need to create a load single user information action to get the selected user details. And loadUserByIdSuccess for storing data after receiving data from API, and loadUserByIdFailure action to store the error which is thrown by the API.

- Effects are like interceptors/listeners whenever we are dispatching the action. At that time effect will be triggered and it will call the service, If the service gives a response, at that time it will call the success action. If it returns an error, it will call the failure action.

- Reducers are mainly used for updating the store data based on the actions. In this example, we are updating users’ objects.
- Selectors are used to getting the data from the updated state. the updated state will be available in the reducer (NgRx Store).

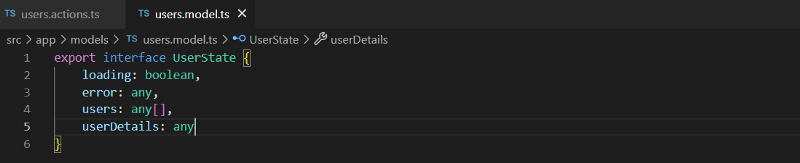
Step 10. After successfully generating all the files. Create user model for user state in app/store/models/ folder.
After completing this, please do “npm install” and after running the application by using “ng serve”.
If in case any error is found while running the application, Please open the “package.json” file.
Check the “NgRx versions” and “Angular Version” is the same or not. If it is not the same please change the version like below*. **If no errors this process is not required.*

After that check the app.module.ts file and change the effect statement forFeature to forRoot like below.
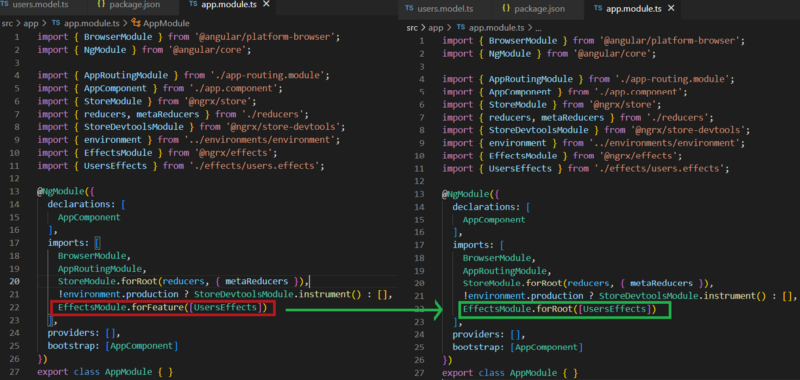
Step 11. Open app.module.ts and add the below statement in the side imports array to load redux dev tools in the application local environment. If it is already available, Please ignore this point.
!environment. production? StoreDevtoolsModule.instrument() : []
If you don’t know how to install chrome dev tools click on this link and add to chrome. If already did this one please ignore it.
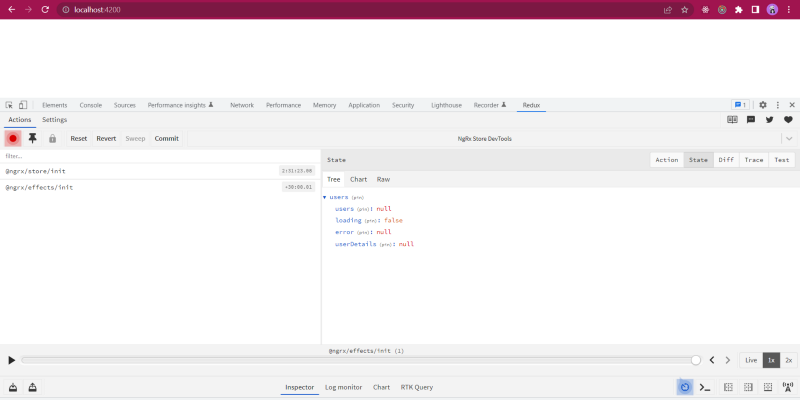
Open the project by using “localhost:4200” and inspecting it you can able to see redux dev-tools with no state information.
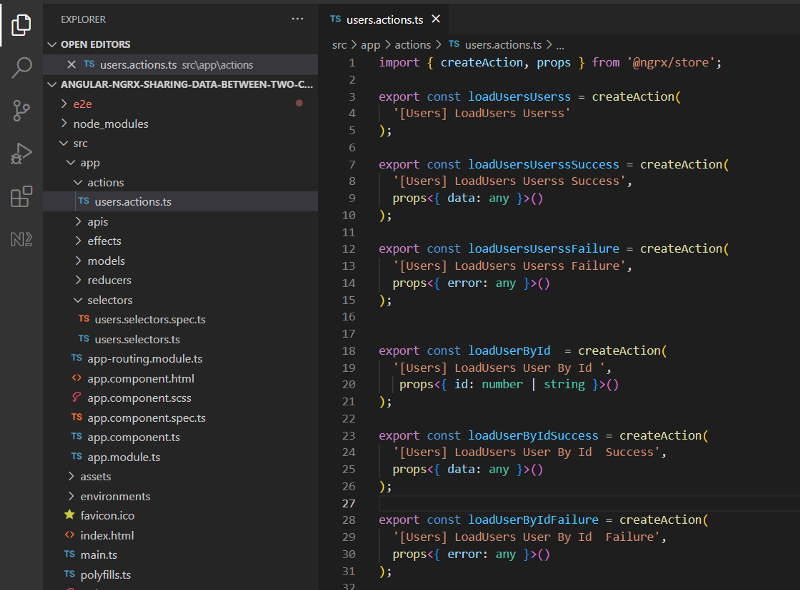
Step 12. Open the “users.action.ts” file and add the below actions. If you want to add new actions you can add them here.
If you run the “ng generate action actions/users” command, It will generate actions by default, But it will generate only 3 actions.
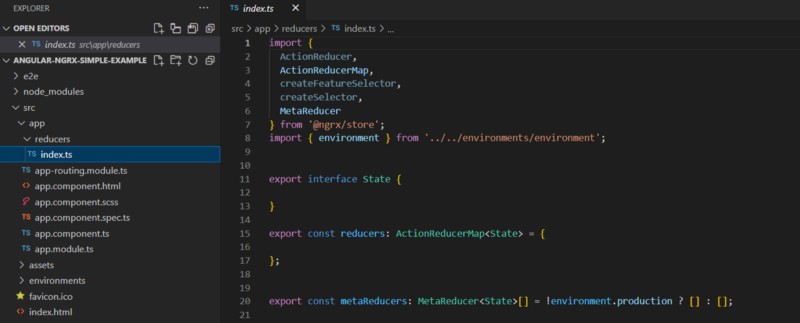
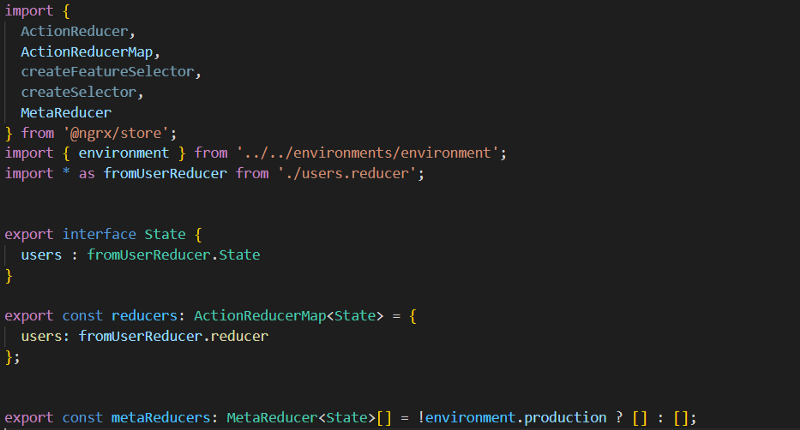
Step 13. Open the “index.ts” file from “app/reducers” and add the below changes. This index.js js is a file used to combine multiple reducers
- First, import the user reducer in index.js by using the below statement.
import * as fromUserReducer from ‘./users.reducer’;
- Add State of userReducer in state interface like below. In the same way, we can add multiple states as of now we are adding only one.
export interface State { users : fromUserReducer.State}
- Add reducer in ActionReducerMap, the same way we can add multiple reducers, As of now we are adding only one.
export const reducers: ActionReducerMap<State> = {users: fromUserReducer.reducer };
Please find the overall file for the test if you miss the code.
After successfully adding the above step you can able see the changes in the redux dev tools, For that, you need to run the application and go chrome dev tools so that you can able to see the redux tab and you will see the empty state object.

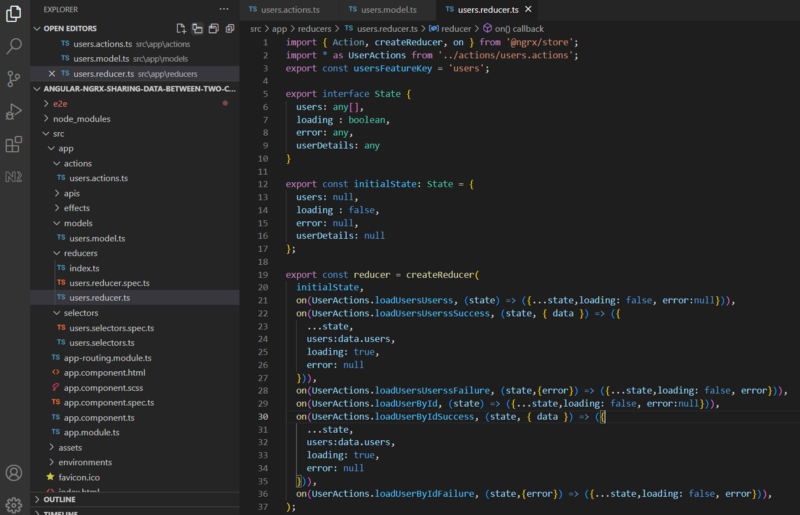
Step 14. Open the “users.reducers.ts ”file and add the below changes.
- Import user actions by using the below statement in the side “users.reducers.ts” file.
import * as UserActions from '../actions/users.actions';
- Add data types in the side State interface like below.
export interface State {
   users: any[],
   loading : boolean,
   error: any,
   userDetails: any
}
- Declare properties with default values inside the state object. In that way at the time of initial app load, It will give you default values. Once the service returns a response from API. The state will be updated by the reducer with new values.
export const initialState: State = {
  users: null,
  loading : false,
  error: null,
  userDetails: null
};
- Add actions inside the reducer function to update the state based on the action type.
export const reducer = createReducer(
  initialState,
  on(UserActions.loadUsersUserss, (state) => ({...state,loading: false, error:null})),
  on(UserActions.loadUsersUserssSuccess, (state, { data }) => ({
    ...state,
    users:data.users,
    loading: true,
    error: null
  })),
  on(UserActions.loadUsersUserssFailure, (state,{error}) => ({...state,loading: false, error})),
  on(UserActions.loadUserById, (state) => ({...state,loading: false, error:null})),
  on(UserActions.loadUserByIdSuccess, (state, { data }) => ({
    ...state,
    users:data.users,
    loading: true,
    error: null
  })),
  on(UserActions.loadUserByIdFailure, (state,{error}) => ({...state,loading: false, error})),
);
- After changing all these the overall file will look like the below.
Open the application and go to chrome dev tools click on the redux tab, You will see the four values in the side users state in redux dev tools.
Up to everything clear right, If anything did wrong please check from the first point.
Step 15. Open the users.selector.ts file and add the below lines of code to read data from the store.
- First import UserReducer by using the below statement.
import * as fromUserReducer from '../reducers/users.reducer';
- To get the state object from userReducer. Please add the below statement.
export const getUsersState = createFeatureSelector<fromUserReducer.State>('users');
- Add the below methods inside selectors, To get specific data from the store.
export const loading = createSelector(
    getUsersState,
    (state: fromUserReducer.State) => state.loading
);

export const getUsers = createSelector(
    getUsersState,
    (state: fromUserReducer.State) => state.users
);

export const getUserDetails = createSelector(
    getUsersState,
    (state: fromUserReducer.State) => state.userDetails
);
- The Overall file looks like the below please check if you miss anything or not.

Step 16. After all these are done, We need to add the changes in effects and also create user service.
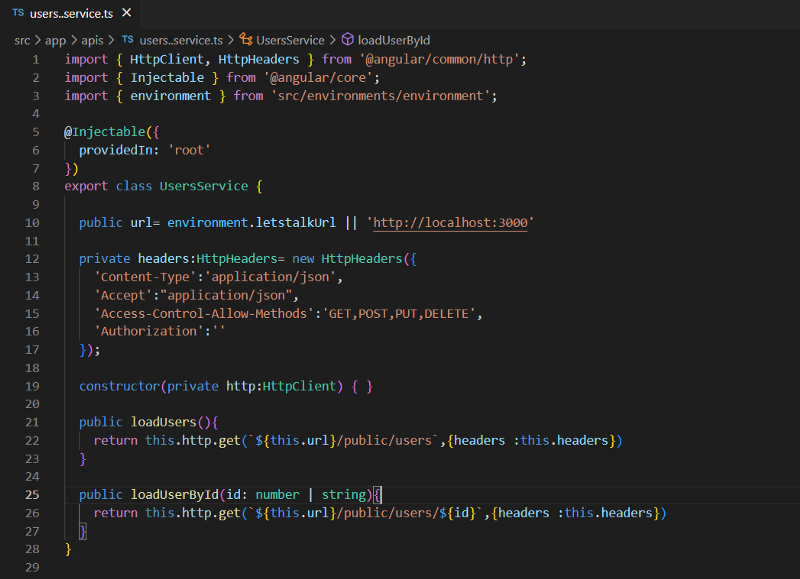
Create UserServie under the “apis/” folder and add the below lines of code.
- To generate a service file please use the below command and also add HttpClientModule inside “app.module.ts”.
ng generate service apis/users

- Open the users.service.ts file, Create the loadUsers method to get all the user’s data, and loadUserById to get the user information from the API.
private headers:HttpHeaders= new HttpHeaders({from
    'Content-Type':'application/json',
    'Accept':"application/json",
    'Access-Control-Allow-Methods':'GET,POST,PUT,DELETE',
    'Authorization':''
  });

constructor(private http:HttpClient) { }

public loadUsers(){
    return this.http.get(`http://localhost:3000/public/users`,{headers:this.headers})
}

public loadUserById(id: number | string){
    return this.http.get(`${this.url}/public/users/${id}`,{headers :this.headers})
 }
The overall file looks like the below, Please check twice if you miss anything.
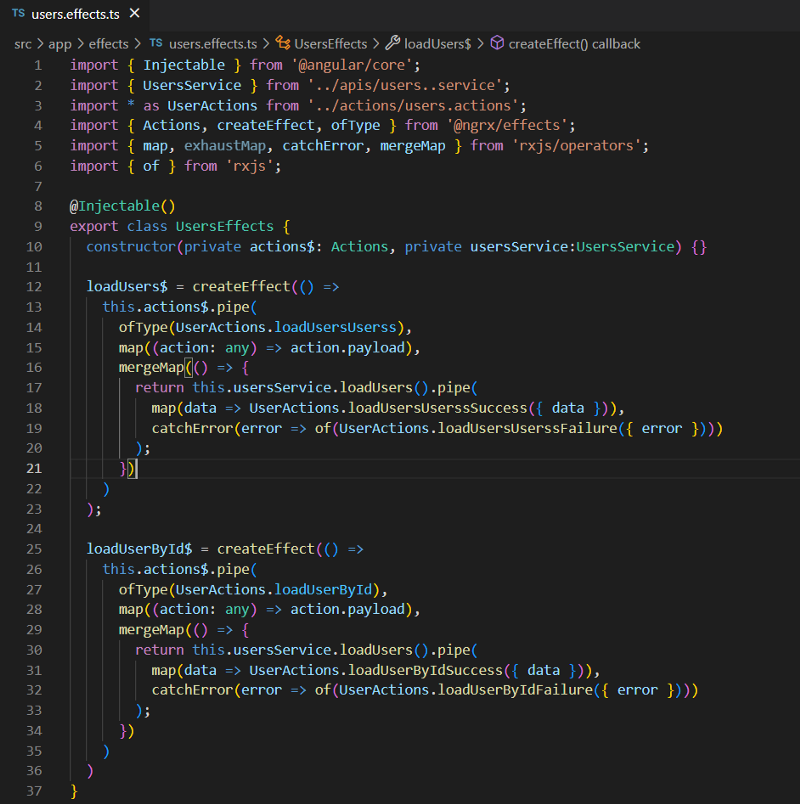
Step 17. Open the users.effect.ts file and add the below lines of code.
- Import UsersService and add as a dependency in the constructor, Also Import User actions to mention inside the effects.
import { Injectable } from '@angular/core';
import { Actions, createEffect } from '@ngrx/effects';
import { UsersService } from '../apis/users.service';
import * as UserActions from '../actions/users.actions';

@Injectable()
export class UsersEffects {
  constructor(private actions$: Actions, private usersService:UsersService) {}
}
- Create load users effect and add below lines of code inside that effect to call the service whenever the action is called the effect will be called and it call the other actions after a response or error came from the service.
loadUsers$ = createEffect(() =>one
    this.actions$.pipe(
      ofType(UserActions.loadUsersUserss),
      map((action: any) => action.payload),
      mergeMap(() => {
        return this.usersService.loadUsers().pipe(
          map(data => UserActions.loadUsersUserssSuccess({ data })),
          catchError(error => of(UserActions.loadUsersUserssFailure({ error })))
        );
      })
    )
  )
- Create load user by id effect and add below lines of code inside that effect to call the service whenever the action is called the effect will be called and it call the other actions after a response or error came from the service.
loadUserById$ = createEffect(() =>
    this.actions$.pipe(
      ofType(UserActions.loadUserById),
      map((action: any) => action.id),
      mergeMap((id) => {
        return this.usersService.loadUserById(id).pipe(
          map(data => UserActions.loadUserByIdSuccess({ data })),
          catchError(error => of(UserActions.loadUserByIdFailure({ error })))
        );
      })
    )
  )
- The Overall file looks like the one below.
Step 18. Finally we completed all the parts of code related to NgRx Store except dispatching the action and showing data in the UI.
Step 19. Our project is we need to share the data between two components for that, I need to create the User-List and User -details components by using the below command.
Here, the User list component is for loading all the users, if the user clicks on any user and user details component will display that user information based on the selected user id.
ng generate component user-list
ng generate component user-details
Step 20. Open app.component.html and add user-list and user-details component selectors.
<div class="container  m-4 row">
    <app-users-list class="col-md-6"></app-users-list>
    <app-user-details class="col-md-6"></app-user-details>
</div>
Step 21. Open the “users-list.component.ts” file, To load user’s data from API and display data in the component.
- Import store form @ngrx/store and add it as a dependency in the constructor by using the below lines of code.
import { Component, OnInit } from '@angular/core';
import { Store } from '@ngrx/store';

@Component({
  selector: 'app-users-list',
  templateUrl: './users-list.component.html',
  styleUrls: ['./users-list.component.scss']
})
export class UsersListComponent implements OnInit {

constructor( private readonly store: Store){}

ngOnInit(): void {}

}
- Import user actions inside the users-list component and also dispatch the load users action to store the user’s data inside NgRx Store.
import { Component, OnInit } from '@angular/core';
import { Store } from '@ngrx/store';
import * as UserActions from "../../actions/users.actions";**

@Component({
  selector: 'app-users-list',
  templateUrl: './users-list.component.html',
  styleUrls: ['./users-list.component.scss']
})
export class UsersListComponent implements OnInit {
  constructor( private readonly store: Store){}
  ngOnInit(): void {
    this.store.dispatch(UserActions.loadUsersUserss());
  }
}
- After that import user selectors inside the users-list component and declare the users$ variable to store data. And use the selector to get the updated data from the NgRx Store.
import { Component, OnInit } from '@angular/core';
import { Store } from '@ngrx/store';
import * as UserActions from "../../actions/users.actions";
import * as UserSelectors from "../../selectors/users.selectors";

@Component({
  selector: 'app-users-list',
  templateUrl: './users-list.component.html',
  styleUrls: ['./users-list.component.scss']
})
export class UsersListComponent implements OnInit {

users$: any;

constructor( private readonly store: Store){}**

ngOnInit(): void {
    this.store.dispatch(UserActions.loadUsersUserss());
    this.users$ = this.store.select(UserSelectors.getUsers);
  }

}
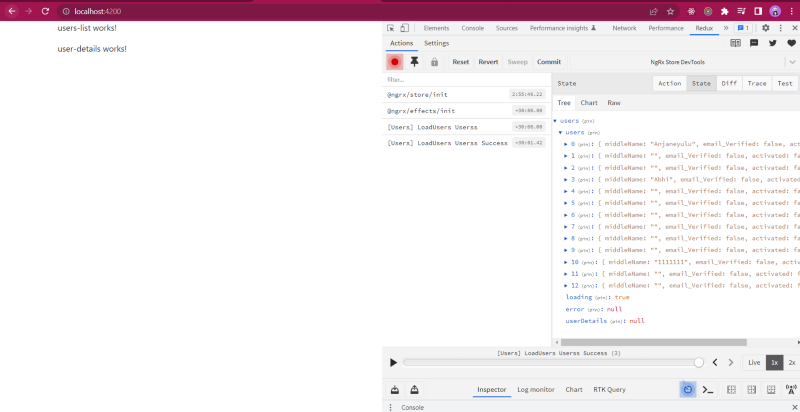
Once all the above points are completed, Open the application in the browser and inspect the browser window click on the redux tab, You can able to see the data inside redux dev tools as below.
Step 22. So we have data in the store but we are not able to see the data on a screen, For that, we need to add some code inside HTML also.
Open users-list.component.html and add the below lines of code to display the data inside UI.
<div class="container mt-4 pt-4" *ngIf="users$ | async as users">
    <h3>List of Users ({{users.length}})</h3>
    <ul class="list-group mt-4">
        <li class="list-group-item" *ngFor="let user of users">
            {{user.firstName}} {{user.secondName}}
            <strong>(@{{user.userName}})</strong>
        </li>
    </ul>
</div>
Step 23. After that we can able to see the user’s data in HTML, But we can’t select the user. For that, we need to create selectedUserId and give the value as -1.
If we have not selected a user (meaning not click on any li item) the value of selectedUserId is not changed and In UI no user is highlighted. Create method selectUser to update the selectedUserId.
import { Component, OnInit } from '@angular/core';
import { Store } from '@ngrx/store';
import * as UserActions from "../../actions/users.actions";
import * as UserSelectors from "../../selectors/users.selectors";

@Component({
  selector: 'app-users-list',
  templateUrl: './users-list.component.html',
  styleUrls: ['./users-list.component.scss']
})
export class UsersListComponent implements OnInit {

  users$: any;
  public selectedUserId =-1;

  constructor( private readonly store: Store){}

  ngOnInit(): void {
    this.store.dispatch(UserActions.loadUsersUserss());
    this.users$ = this.store.select(UserSelectors.getUsers);
  }

  public selectUser(id){
    this.selectedUserId = id;
  }

}
After that, Update the HTML code to call the selectUser method as a click event in LI Tag. And also update the class based on user selection to highlight the li tag.
<div class="container mt-4 pt-4" *ngIf="users$ | async as users">
    <h3>List of Users ({{users.length}})</h3>
    <ul class="list-group mt-4">
        <li class="list-group-item" *ngFor="let user of users"  class="list-group-item {{user._id === selectedUserId ? ' active' :''}}" (click)="selectUser(user?._id)">
            {{user.firstName}} {{user.secondName}}
            <strong>(@{{user.userName}})</strong>
        </li>
    </ul>
</div>
After that call the action loadUserById to store the user Information inside the store. In that way, we can able to get the selected user details entire app.
import { Component, OnInit } from '@angular/core';
import { Store } from '@ngrx/store';
import * as UserActions from "../../actions/users.actions";
import * as UserSelectors from "../../selectors/users.selectors";

@Component({
  selector: 'app-users-list',
  templateUrl: './users-list.component.html',
  styleUrls: ['./users-list.component.scss']
})
export class UsersListComponent implements OnInit {

users$: any;
public selectedUserId =-1;

constructor( private readonly store: Store){}

ngOnInit(): void {
    this.store.dispatch(UserActions.loadUsersUserss());
    this.users$ = this.store.select(UserSelectors.getUsers);
  }

public selectUser(id){
    this.selectedUserId = id;
    this.store.dispatch(UserActions.loadUserById({id}))
  }

}
Step 24. All this is Done, Just check in the chrome dev tools whether user details are loading or not.
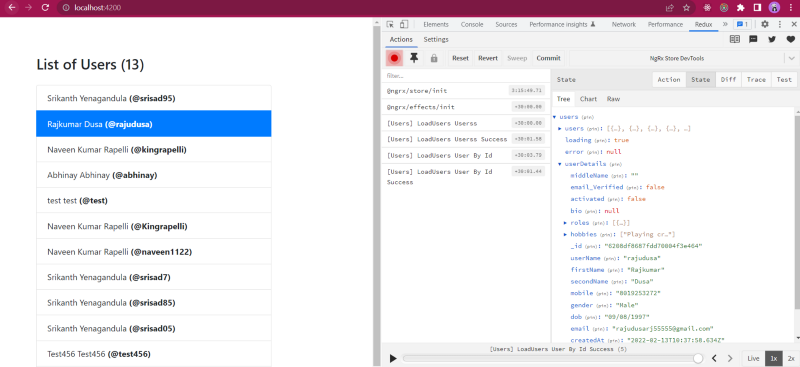
Step 25. Hmmm, Finally we did all the changes inside the user-list component and we are updating the user details based on user selection from the user list component. If you see the above screen, You will find the user is highlighted and user details are available inside the NgRx store but In the user details component, the selected user details are not showing.
Step 26. For that, Open user-details.component.ts and follow the below steps.
- Import store form [@ngrx/store](http://twitter.com/ngrx/store "Twitter profile for @ngrx/store") and add it as a dependency in the constructor by using the below lines of code
import { Component, OnInit } from '@angular/core';
import { Store } from '@ngrx/store';

@Component({
  selector: 'app-user-details',
  templateUrl: './user-details.component.html',
  styleUrls: ['./user-details.component.scss']
})
export class UserDetailsComponent implements OnInit {
constructor( private readonly store: Store){}

ngOnInit(): void {}
}
- After that import user selectors inside the users-details component and declare the userDetails$ variable to store data. And use the selector to get the updated data from the NgRx Store.
import { Component, OnInit } from ' @angular/core';
import { Store } from '@ngrx/store';
import * as UserSelectors from "../../selectors/users.selectors";

@Component({
  selector: 'app-user-details',
  templateUrl: './user-details.component.html',
  styleUrls: ['./user-details.component.scss']
})
export class UserDetailsComponent implements OnInit {**

userDetails$: any;
constructor( private readonly store: Store){}**

ngOnInit(): void {
    this.userDetails$ = this.store.select(UserSelectors.getUserDetails);
  }
}
- Lastly, Open the users-details component and add the below HTML code to display user details inside UI.
<div *ngIf="userDetails$ | async as user" class="m-4 p-2" >
<ng-container *ngIf="user._id">
<h3>{{user.firstName}} {{user.secondName}}</h3>
<p>Username : {{user.userName}}</p>
<p>Mobile : {{user.mobile}}</p>
<p>Email : {{user.email}}</p>
<p>DOB : {{user.dob | date:'medium'}}</p>
<p>Bio : {{user.bio ? user.bio : 'Not Given'}}</p>
<p>Gender : {{user.gender}}</p>
</ng-container>
</div>
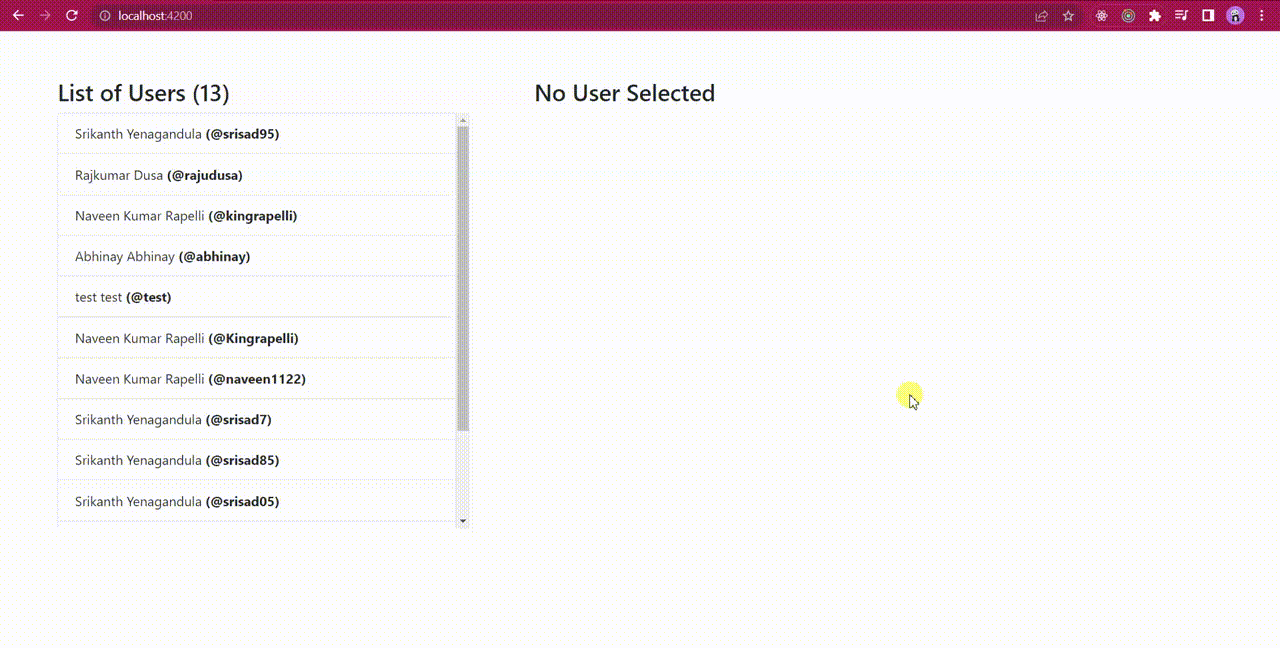
<ng-container *ngIf="!(userDetails$ | async)">
<h3 class="m-4 p-2">No User Selected</h3>
</ng-container>
Step 27. Hey !!! I saw the data in the browser chrome dev tools and UI, While selecting the user the API is calling and storing the data inside the store. Inside the User details component, the selector will take the updated value of user details from the store. This way we can share the data from one component to another component using NgRx. Please check the below output.
Source:
Frontend: angular-ngrx-sharing-data-between-two-components
Backend: Letstalk-Backend
Live Backend URI: https://letstalk-be.herokuapp.com/
Thanks for reading my article, Please share your feedback, claps, and comments. In that way, it will be helped me to improve my articles in the future. Please share my story with your near and dear