Angular PrimeNg Setup with Simple Card Example (Learn it in 15 Steps)

Hi Everyone !!!
Am Srikanth Y,
Software Engineer | Front End Developer |Story Teller | Problem solver, Having Realtime experience in Angular, JavaScript, and Java.
Git Hub: github.com/mryenagandula. StackBlitz : stackblitz.com/@mryenagandula Medium: mryenagandula.medium.com
Please support Srikanth Y (buymeacoffee.com/mryenagandula)
Note To Audience : There is a problem in some Articles due to the conversion of the medium articles. Am working on modifying them. Sorry For the inconvenience.
Thanks
Hey, Everyone, this is my favorite library, and am integrating it into the angular application, and parallelly I will do more examples on this library as well. So, Please find the below steps to integrate the PrimeNg library.

PrimeNg Tutorial
Step 1. Create an angular project with the below command.
ng new angular-primeng-setup-simple-example
Step 2. After successful creation of the angular app, change the file directory to project-name. “cd angular-primeng-setup-simple-example”
Open the project in vs code using “code .” in terminal or open with vs code. Then run the project using “ng serve” in the terminal. Open project in chrome using localhost:4200
Step 3. Open the app component in vs code and remove the content which is created by angular CLI while creating the app. For adding the PrimeNg library please follow the below commands.
npm install primeng --save
npm install primeicons --save
npm install font-awesome --save
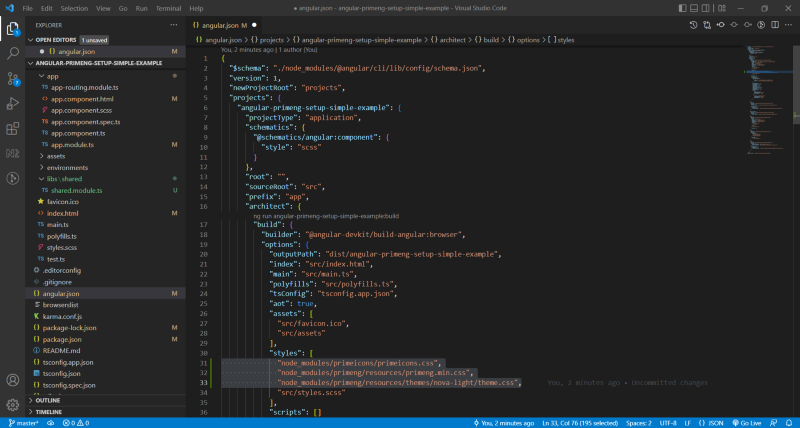
Step 4. After that open the angular.json file and add PrimeNg Styles like below.
Step 5. Open the package.json file and changes the versions of PrimeNg accordingly.

Step 6. Do npm install and ng serve and open the application in the browser by using localhost:4200. You will find the below error.

Step 7. For solving the above error, I did some research and I found the below libraries to install.
npm install chart.js --save
npm install quill --save
npm install @fullcalendar/core --save
Step 8. After installing the above libraries do npm install and ng serve. Open the app in the browser and see the changes if still, an error occurs **please check all the above steps once again.
Step 9 . PrimeNg provides flex concept in the form of one library i.e. primeflex. Am very much interested to install this library. If you are not interested please ignore this step.
/*Use the below command to install the prime flex.*/

npm install primeflex --save
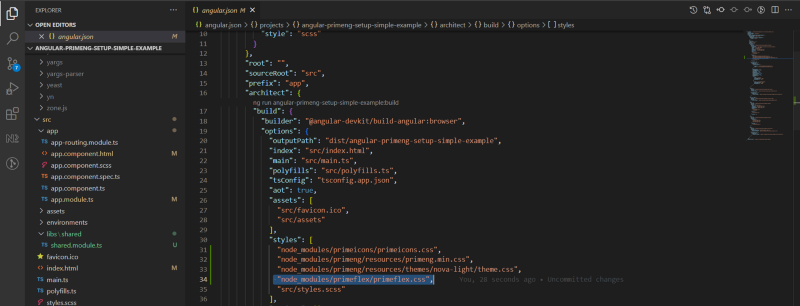
Step 10. Open the angular.json file and add the below CSS for prime flux.
If you want to know more about primeflex please click on this link https://www.primefaces.org/
If you want to know more about PrimeNg, Please click on this link https://www.primefaces.org/
Step 11. After that create a shared library under the src/libs folder by using the below command.
ng generate module shared
Step 12. Open app.module.ts and import SharedModule and add inside imports array.
import { BrowserModule } from '@angular/platform-browser';
import { NgModule } from '@angular/core';

import { AppRoutingModule } from './app-routing.module';
import { AppComponent } from './app.component';
import { SharedModule } from '../libs/shared/shared.module';

@NgModule({
  declarations: [
    AppComponent
  ],
  imports: [
    BrowserModule,
    AppRoutingModule,
    SharedModule
  ],
  providers: [ ],
  bootstrap: [AppComponent]
})
export class AppModule { }
Step 13. In this project, I am using PrimeNg cards to display data in the form of cards. For that, Open shared.module.ts, Import CardModule, and it into both import and export array. In that way, you can import the shared module into any module.
The shared module is not for only importing and exporting one module. You can add multiple modules in the import and export array. For this project alone, I added only one module.
import { NgModule } from '@angular/core';
import { CommonModule } from '@angular/common';
import { CardModule } from 'primeng';
@NgModule({
  declarations: [],
  imports: [
    CommonModule,
    CardModule
  ],
  exports:[
    CardModule
  ]
})
export class SharedModule { }
Step 14. Open app.component.html and add the below HTML to load the cards.
<ng-container>
  <h2>Profiles</h2>
  <div class="p-grid" style="display: flex;flex-wrap: wrap; margin: 5px;">
    <p-card header="Mr Yenagandula" subheader="GITHUB" [style]="{'width': '25rem', 'margin':'1em', 'margin-bottom': '2em'}">
      <p>Software Engineer | Front End Developer | Story Teller | Angular | JavaScript | React | Java , Researching Programs Solving Techniques and Data Structures.</p>
    </p-card>
    <p-card header="Mr Yenagandula" subheader="MEDIUM" [style]="{'width': '25rem', 'margin':'1em','margin-bottom': '2em'}">
      <p>Software Engineer | Front End Developer | Story Teller | Angular | JavaScript | React | Java , Researching Programs Solving Techniques and Data Structures.</p>
    </p-card>
    <p-card header="Mr Yenagandula" subheader="STACKBLITZ" [style]="{'width': '25rem','margin':'1em', 'margin-bottom': '2em'}">
      <p>Software Engineer | Front End Developer | Story Teller | Angular | JavaScript | React | Java , Researching Programs Solving Techniques and Data Structures.</p>
    </p-card>
    <p-card header="King Rapelli" subheader="GITHUB" [style]="{'width': '25rem', 'margin':'1em','margin-bottom': '2em'}">
      <p>Software Engineer | Front End Developer | Angular | JavaScript </p>
    </p-card>
    <p-card header="Abhinay Developer" subheader="GITHUB" [style]="{'width': '25rem', 'margin':'1em','margin-bottom': '2em'}">
      <p>Software Engineer | Front End Developer | Angular | JavaScript | Java | Spring </p>
    </p-card>
  </div>
</ng-container>
Step 15.Note: Here in PrimeNg, Every tag will start with p-
e.g.
Output :
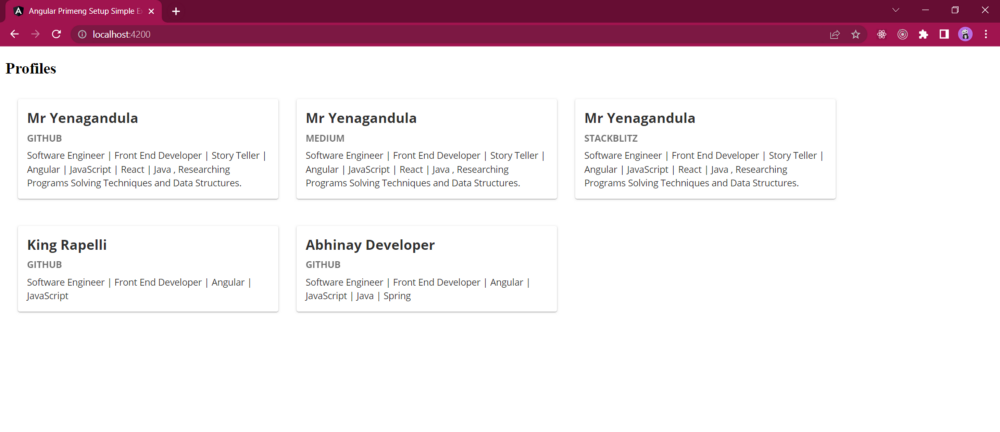
Source Code:
Front End:
GitHub: angular-primeng-setup-simple-example
Thanks for reading my article, Please share your feedback, claps, and comments. In that way, it will be helped me to improve my articles in the future. Please share my story with your near and dear


