Angular Sharing Data from Parent to Child Using @ViewChild (Learn It In 19 Steps- MrYenagandula)


Please find the below steps to implement the sharing data between parent-to-child components using @ViewChild in the angular application

Photo by Zahra Amiri on Unsplash
- Create an angular project with the below command.
ng new angular-input-and-output-with-viewchild
2. After successful creation of the angular app, change the file directory to project-name. by using the below command
cd angular-input-and-output-with-viewchild
3. Open the project in vs code using “code .” or open with “vs code” after that run the project by using the “ng serve” command and Open the project in the browser using localhost:4200
4. Open the app component in vs code and remove the content created by angular CLI while developing the app.
5. Generate components of the users, the user’s list, and the user details components under the components folder, and create user service under the apis folder by using the below commands.
ng generate component users
ng generate component users-list
ng generate component users-details
ng generate service user-service
6. After successfully creating the above files.
- Open the “users.component.html” file in vs code by using Ctrl + P and add the users-list selector.
- Also, add the user component in the app routing module file.
const routes: Routes = [
{
path:'users',
component: UsersComponent
}
];
@NgModule({
imports: [RouterModule.forRoot(routes)],
exports: [RouterModule]
})
export class AppRoutingModule { }
7. Open the user service file and add the below code to call the users, and single user info from the backend service.
private headers:HttpHeaders= new HttpHeaders({
'Content-Type':'application/json',
'Accept':"application/json",
'Access-Control-Allow-Methods':'GET,POST,PUT,DELETE',
'Authorization':''
});
constructor(private http:HttpClient) { }
// To get all the users
public loadUsers(){
return this.http.get(`localhost:3000/public/users`,{headers :this.headers})
}
// To get the single user info
public loadUsersById(id){
return this.http.get(`localhost:3000/public/users/${id}`,{headers :this.headers})
}
8. Open the users-list component and import the user service and add it as a dependency in the constructor like below.
import { UsersService } from 'src/app/apis/users.service';
constructor(private api: UsersService) { }
9. After that create a variable usersData for storing user’s data and create a selectedUserId variable to store the selected user id for highlighting the row. Create a loadUsers() method to call the service to load all the users. And also call the load Users method in side the ngOnInit().
public usersData:any;
public selectedUserId="-1";
constructor(private api: UsersService) { }
public ngOnInit(): void {
this.loadUsers();
}
public async loadUsers(){
const res = await this.api.loadUsers().toPromise().then((res:any)=> res.users);
this.usersData = res;
}
10. Opps not added HTML content to display the user’s data, For that add below HTML code.
*<div \ngIf="usersData">
<li
class="list-group-item"
*ngFor="let user of usersData"
[ngClass]="{'active': selectedUserId === user._id}"
(click)="selectedUser(user)"
    >
        {{user.firstName}} {{user.secondName}} <strong>(@{{user.userName}})</strong>
    </li>
</ul>
**
11. After that just check the changes by opening the application in the side browser using localhost:4200 and check it properly, If you found anything wrong please check all the steps. Run npm install and ng serve.
12. Open the user-details component and import the user service file and add it as a dependency in the constructor.
import { UsersService } from 'src/app/apis/users.service';
constructor(private api: UsersService) { }
13. Create a variable usersDetails to store the selected user info and create the loadUserById() method and add logic to call the service.
public usersDetails:any;
constructor(private api: UsersService) { }
public ngOnInit(): void {}
public async loadUsersById(value){
const res = await this.api.loadUsersById(value).toPromise().then((res:any) => res.user);
this.usersDetails = res;
}
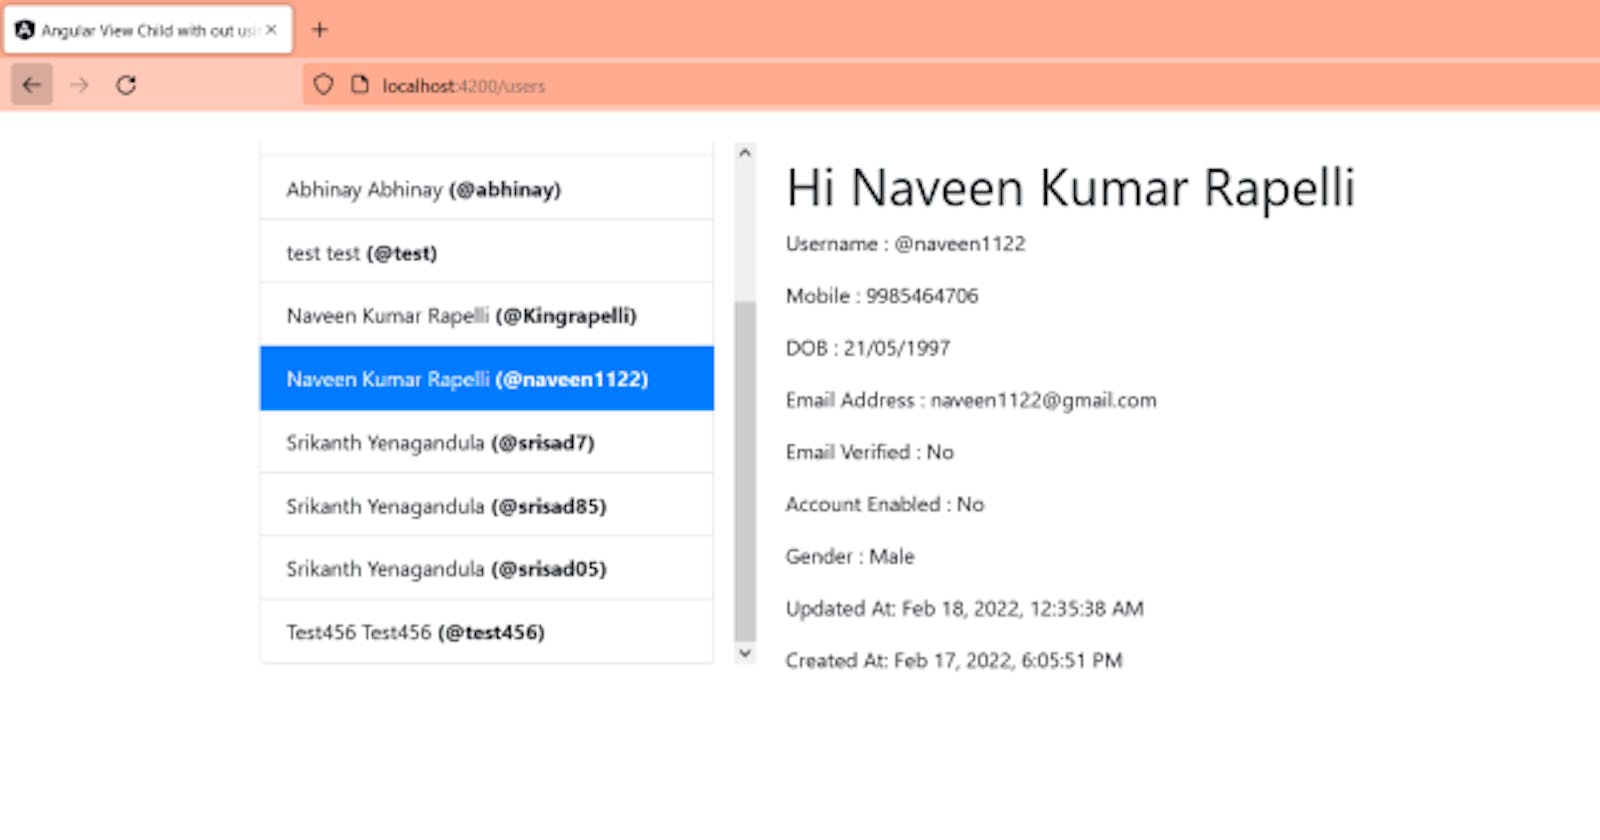
- Add Html code inside the user-details component to load the user details,
*<div class="p-2" \ngIf="usersDetails">
Hi {{usersDetails.firstName}} {{usersDetails.secondName}}
Username : @{{usersDetails.userName}}
Mobile : {{usersDetails.mobile}}
DOB : {{usersDetails.dob}}
Email Address : {{usersDetails.email}}
Email Verified : {{usersDetails.email_Verified ? "Yes" : "No"}}
Account Enabled : {{usersDetails.activated ? "Yes" : "No"}}
Gender : {{usersDetails.gender}}
Updated At: {{usersDetails.updatedAt | date:'medium'}}
Created At: {{usersDetails.createdAt | date:'medium'}}
OOPS!!! User Not Selected, Please Select Any User
14. As of now am not able to get the user id from the users-list component and In the users list component, we are not sending the user id to the user-details component. There is no relation between these two components. For Sending the user id from one component to another component by using @Viewchild.
15. In this project we added a user-list selector in the side users component. Whenever I selected the user, Am sending the user Id from the users list and passes to the users-details component
16. In that way, the user-details component will get the user id, and based on the user id the user details will be loaded on the user-details page with help of viewchild.
17. Open the users-list component and add the below changes in side users-list.component.ts and users-list.component.html.
- Create selectedUserId variable to highlight the row when the user is selected and add the viewchild of the user-details component to access the user details component public members
public selectedUserId="-1";
@ViewChild(UserDetailsComponent, {static: false})
public userDetailsComponent: UserDetailsComponent;
- Create a selectedUser method to call user-details component loadUsersById() method to pass the selected user id.
public selectedUser(user){
this.selectedUserId = user?._id
this.userDetailsComponent.loadUsersById(user?._id);
}
- After that update the Html to highlight the row and add the selectedUser method to perform the event when the user is selected.
*<div \ngIf="usersData">
<li
class="list-group-item"
*ngFor="let user of usersData"
[ngClass]="{'active': selectedUserId === user._id}"
(click)="selectedUser(user)"
    >
        {{user.firstName}} {{user.secondName}} <strong>(@{{user.userName}})</strong>
    </li>
</ul>
**
18. Open the users-details component and add the below changes.
- Add below Html to display user details. If you added ignore this step.
*<div class="p-2" \ngIf="usersDetails">
Hi {{usersDetails.firstName}} {{usersDetails.secondName}}
Username : @{{usersDetails.userName}}
Mobile : {{usersDetails.mobile}}
DOB : {{usersDetails.dob}}
Email Address : {{usersDetails.email}}
Email Verified : {{usersDetails.email_Verified ? "Yes" : "No"}}
Account Enabled : {{usersDetails.activated ? "Yes" : "No"}}
Gender : {{usersDetails.gender}}
Updated At: {{usersDetails.updatedAt | date:'medium'}}
Created At: {{usersDetails.createdAt | date:'medium'}}
OOPS!!! User Not Selected, Please Select Any User
19. After everything is done, Do npm install and ng serve to see changes open project by using localhost:4200.
Output :
Screen #1:
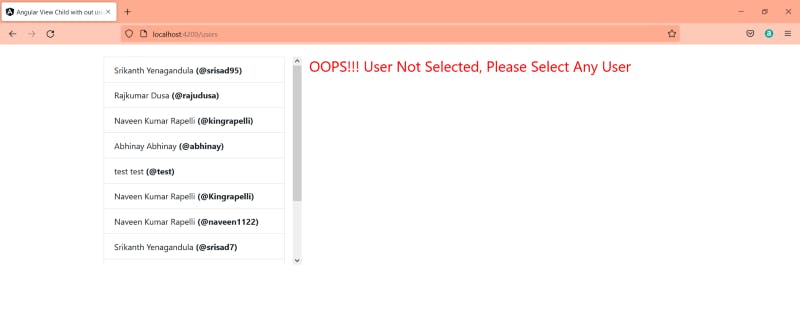
Screen #2:
SOURCE CODE:
Front End:
GITHUB: github.com/mryenagandula/angular-input-and-..
Back End:
GITHUB: github.com/mryenagandula/Letstalk-Backend
Live Backend URI: letstalk-be.herokuapp.com
Stack blitz Project Preview: stackblitz.com/edit/angular-input-and-outpu..
Thanks for reading my article, Please share your feedback, claps, and comments. In that way, it will be helped me to improve my articles in the future. Please share my story with your near and dear, Also follow and subscribe to the medium.